In this post let’s see how to go about Ubuntu 20.04 Initial Server setup on a VPS. I will be using Vultr VPS in this setup. However you can use any VPS to follow along.
Here is a free Vultr Tutorial for beginners. And, here is a free Digital Ocean Tutorial for beginners. And here is a free Hetzner Tutorial on YouTube.
What we’ll do in this Ubuntu 20.04 Initial Server setup
This initial Server setup for Ubuntu 20.04 will cover the following:
- Deploy your server on your VPS platform.
- How to log into your Server using putty.
- Create a new sudo user.
- Setup a firewall
- Setup SSH Key authentication for Ubuntu 20.04
- Disable Root user login
- Add Swap File
- Bonus – Install Virtualmin – LEMP stack
Related : Free Virtualmin Tutorial on YouTube – Hosting WordPress on a VPS
1. Deploy Server
This part depends on your VPS provider. For this Ubuntu 20.04 initial server setup, I will use Vultr. Signup on Vultr and get $100 credit in your new account.
Deploy your server and then follow along with the next steps.
2. Log into your Linux server using putty
Download and install putty from the official putty website. Install one of the Package files with all Putty utilities (often listed at the very top) .
If you are following along on a Mac or Linux, this is how to log in via terminal.
To log in, you will need your IP address, user and password. All these details are available in your Admin dashboard.
The following part about logging in via Putty is taken from this previous Centos 7 server setup post.
Now we can go ahead and log in. To login you will need:
- Putty – Already installed.
- Username – Username for the new Ubuntu 20.04 server is root.
- Password – Copy it from your Admin dashboard .
- IP address – Copy it from your Admin dashboard or the email sent to you after the server was created.
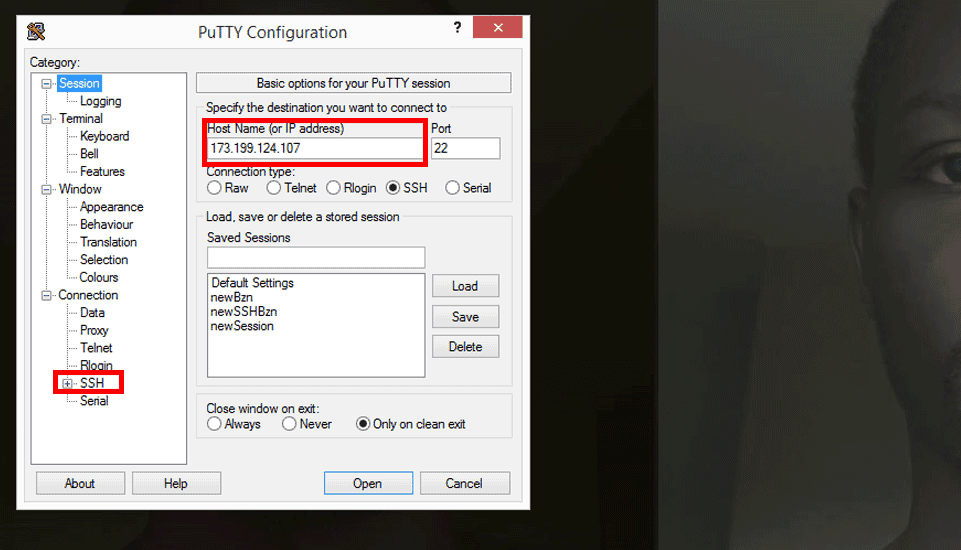
Open Putty . If you are on Windows 8 and above, just search ( Windows Key + W) for Putty and open it.
Then Add your IP address under Hostname (or IP ).
Save the session so that you don’t have to type your IP every time. To do that, give the session a name under saved sessions.
Then click save. To save the session.
Do all the above as marked in the screenshot below.

Now every time you want to login you will just double click on the session you stored. Then put in your username and password on the putty command window.
Double click on your newly stored session now. A prompt will appear as shown below. Click yes.

Then enter username of root. (Login as : root)
Then copy your password from your dashboard. Then right click once to paste it into Putty. While inputting the password, you will not see any output. Just press enter to log in.
Tip: To paste anything into putty, just right click once.
Congratulations you are now logged into your server and we can begin setting things up.

3. Create a new sudo user.
The default admin user in your new server is root. The root user is available on every linux system, so everybody knows about it.
For security reasons we will create a new user and give them sudo / admin privileges. Later on, we’ll disable the root login so that no one can log in as root on this Ubuntu 20 server.
Step 1 : Create the new user . Give them a unique secure name.
adduser n3wus3r19
Step 2: Add the user above to the sudo group. Users with sudo privileges can execute root level commands. To do so you must add sudo before every command. Add the user to the sudo group as follows ;
usermod -aG sudo n3wus3r19
If you experience an error whereby sudo is not recognized, install it as follows.
First update the server:
apt update && apt upgrade
Then install sudo
apt install sudo
After installing sudo, restart your server. You can do this via the admin dashboard of your VPS provider or by running :
shutdown -r
or
reboot
Step 3 : Try logging in and running a sudo command.
Log out of your server and try logging in with the new user. Remember to restart your server if you had to install sudo.
Once you log in, try running the following command. Enter the user password when prompted.
sudo apt update
If it runs the sudo command without any issue, you can continue using the new user to set up your server. You will be asked to enter your user password when using sudo or once sessions expire.
Just remember to add sudo before every command, or else you will receive permission denied errors.
Related : Ubuntu 22.04 Initial Server setup
4. Setup a firewall in Ubuntu 20.04
If your intention with your server is to install a control panel like Cpanel, Plesk, Cyberpanel, VestaCP, HestiaCP etc, then you can skip this step. Most control panels will setup the firewall rules appropriately as needed. Confirm with the control panel forums before making up your mind.
The easiest way to setup a Firewall on Ubuntu 20.04 is to use UFW, aka Uncomplicated Firewall . UFW makes it much easier for you to create Firewall rules for Iptables. That’s all it is. An easier way to create and delete rules for your Iptables. Here is a great Ubuntu 20 UFW tutorial on DigitalOcean and also another one on linux.com.
First install UFW if it is not already installed;
sudo apt install ufw
Check the staus of ufw :
sudo ufw status
If it is inactive ,activate it :
sudo ufw enable
You may also disable it:
sudo ufw disable
You can allow various services.
SSH definitely allow this or you won’t be able to log into your server.
sudo ufw allow ssh
You can allow a specific through your firewall;
sudo ufw allow 2003
Block all incoming traffic and allow http and https afterwards :
sudo ufw default deny incoming
Allow HTTP and HTTPS traffic;
sudo ufw allow http

sudo ufw allow https
To enable UFW after setting the rules :
sudo ufw enable
You can delete rules based on their numbers.
First list all the rules based on the numbering ;
sudo ufw status numbered
Look at the number of the rule and delete it. Below will delete rule 5 on the firewall rules.
sudo ufw delete 5
Check if UFW is active and running:
sudo ufw status verbose
You will get a status of active or inactive.
You can deny any connections as well. Close out any ports that are not being used or are being misused. Eg deny outgoing mail:
sudo ufw deny out 25
You can reset all the IFW firewall rules as follows
sudo ufw reset
There are no specific rules for your firewall. Just enable the items you need to enable and disable any traffic you don’t need.
5. Setup SSH Key login for Ubuntu 20.04
If you are using a Mac or Linux, read this detailed post on how to setup SSH key Authentication for your linux server.
If you are using Windows, watch this YouTube tutorial for setting up SSH Key login using Puttygen.
The following part is taken from this VPS Server Setup post.
Adding SSH Keys to your Server
First of all, we need to generate SSH Keys.
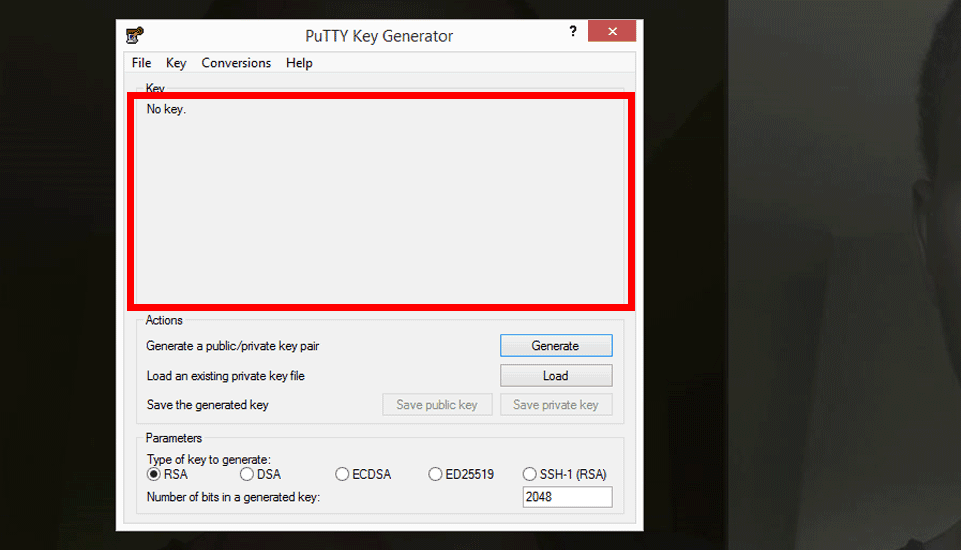
You have installed Puttygen. Open it up. We are going to generate public and private SSH keys.
Once PuTTygen is opened, click generate and Keep moving your cursor in the area highlighted with the red box. Keep Moving the mouse randomly until the Key is fully generated.
For extra security, Add a Key Passphrase to your SSH keys.
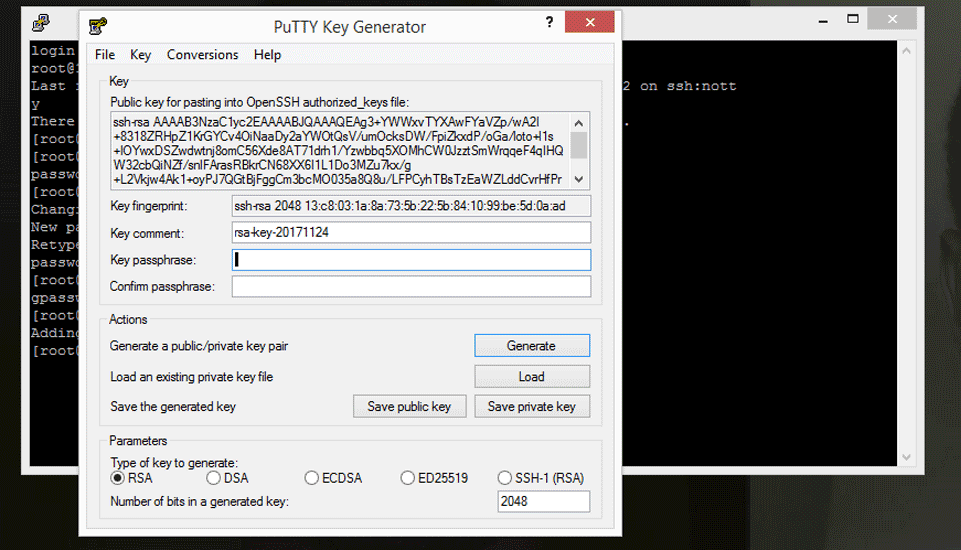
Then click , Save Private key. Store it in a secure area because without it you will not be able to log into your Server after we disable password and root login. Also ensure you can remember you Passphrase because there is no way to retrieve it.
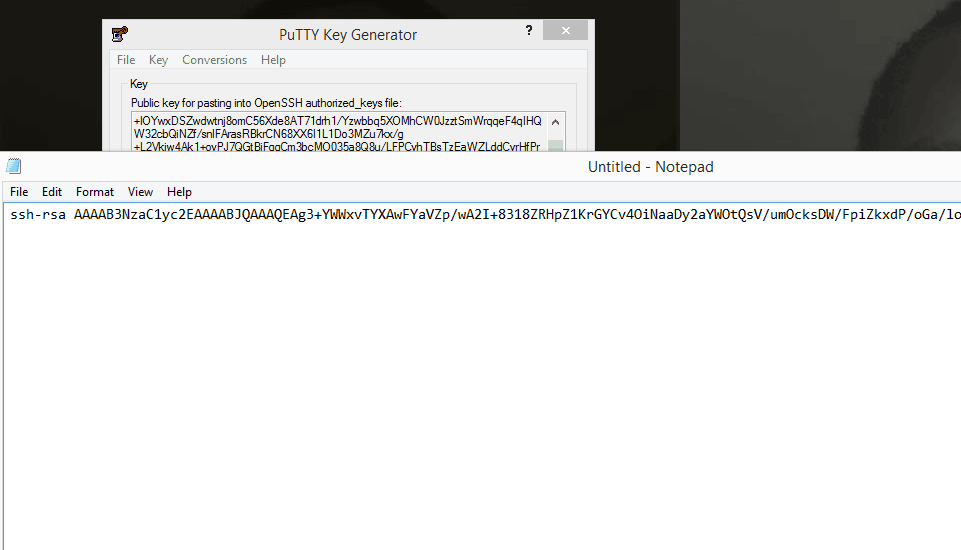
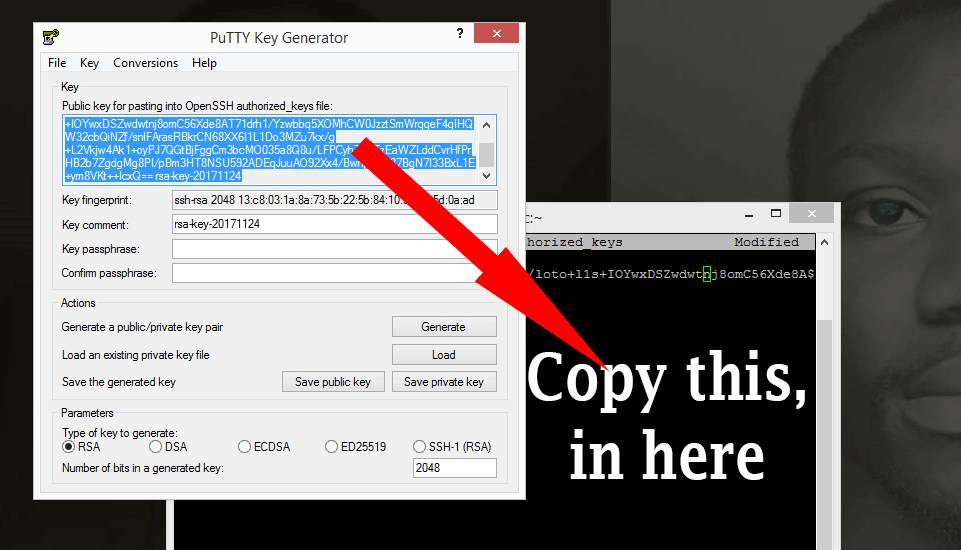
Don’t close puTTygen yet. Copy all the Text in the text box Under : Public Key for pasting into openSSH.. Copy it into a text editor because we’ll use it in a moment.
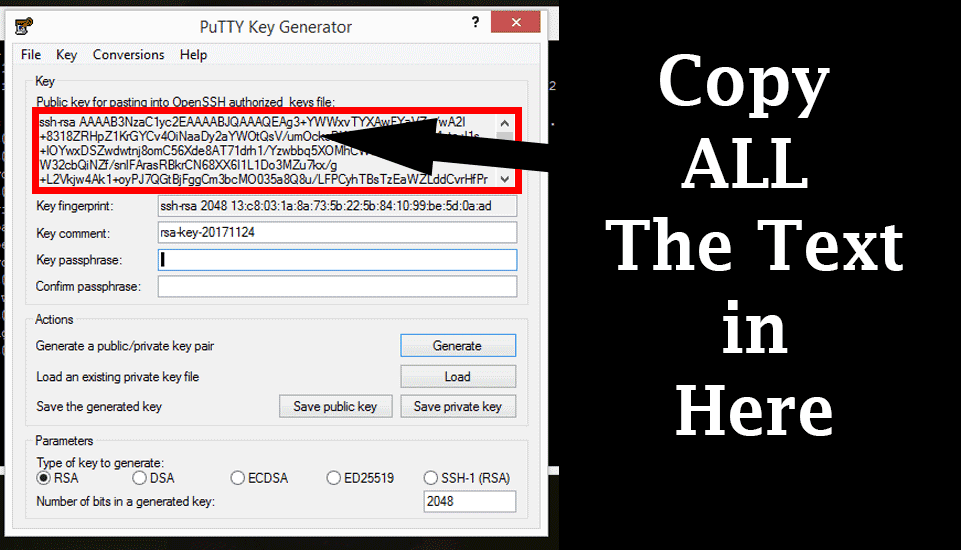
Ensure when you copy it, it is pasted in a straight line as follows . Save the file because you may need it in future.
Make a directory and copy SSH Keys for the new User
First, open a new Putty Window because we need to log into our server again.
Open Putty, double click on your saved Session.
[ Important ] This time round we’ll use your newly created sudo user, not the root user. Enter username as the new admin User you have just created.
Enter the password you created for the new user.
You are now logged into your server.
Note that all commands will now be executed using sudo since you are not the root user. The first time you invoke sudo, you have to enter your password. This will be the password you did set for your new user .
Make the directory and copy ssh keys into it
Paste the below into your command window. This will create the directory and then the second will open it in a command editor called nano . You will then be able to paste your public SSH key in there.
sudo mkdir ~/.ssh;
sudo nano ~/.ssh/authorized_keys
Nano is going to open up authorized_keys. Copy the public key you saved from puttygen .
Right click to paste. Ensure it is copied in a straight line. In one line that is.
Then press CTRL X to exit. Then Y to accept changes. Then press enter.
Change Access Levels for the SSH Folder and SSH Key File
Now let us change the permissions for the folder and the public Key Enter the commands below.
sudo chmod 700 -R ~/.ssh
Then…
sudo chmod 600 ~/.ssh/authorized_keys
Then change ownership to your new user’s Folder …
sudo chown -R joe:joe /home/joe
In the above (that is, sudo chown -R joe:joe /home/joe ), change all instances of joe to the non-root user you created.
Confirm you can log in via SSH with the non-root user
You will need to confirm that you can login into your Server via SSH. This is because in the steps below you will disable password login. You don’t want to get locked out. First enure your non-root user can login via SSH only.
Let us login via PuTTy . Add the Hostname or IP. Use your IP from your Vultr Dashboard.
Then ,all the way down at the bottom you will see SSH.
Expand it then click on AUTH.
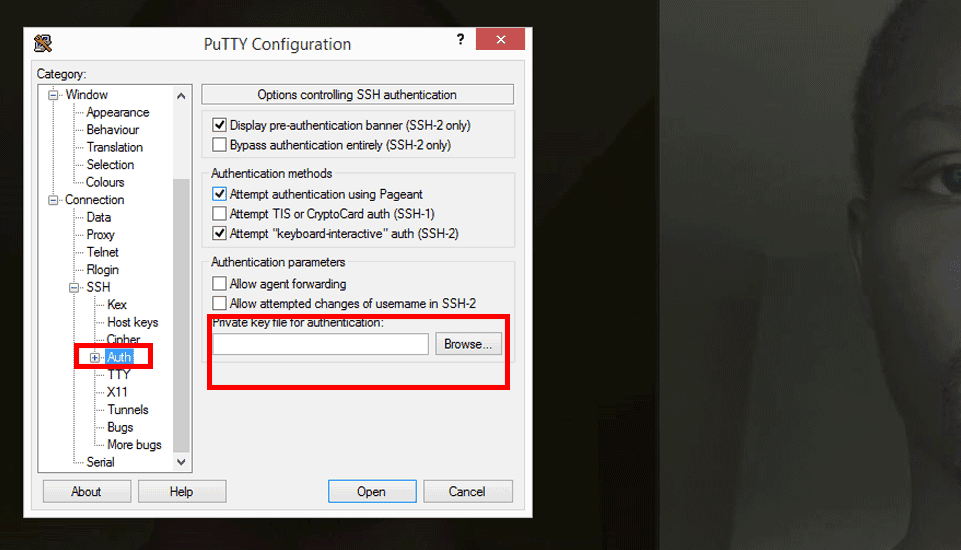
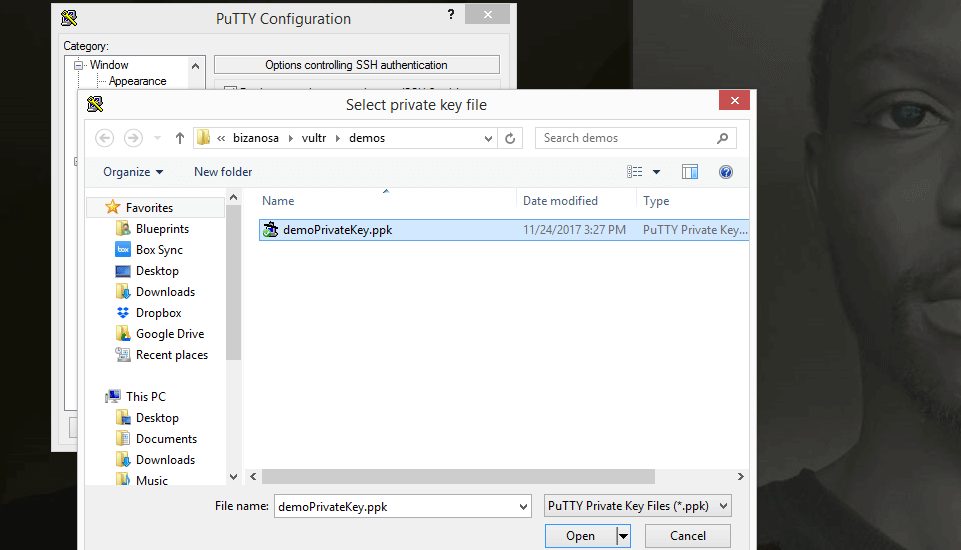
Then click on Browse and browse to the location of your private key. It is stored as .ppk.
Let us save this session so that we don’t have to do this every single time we want to log in. Scroll up to Click on session. Under Saved sessions, give it a name and click save.

To log in…. Now that you have saved your session, login will be as follows:
Double click on the new session you have just created. Then log in as the user you created, the non-root user.
If you added a Passphrase for your SSH key, then type it in.
If you log in successfully then the SSH has been setup correctly for your non-root user . Hence you can now disable the root user login and you can also disable password login into your server. All these will be covered below.
Related : Free Virtualmin Tutorial on YouTube – Hosting WordPress on a VPS
6. Disable Root user login and disable Password Authentication
Once you have setup SSH auth login. Once you’ve confirmed that you can successfully login with the sudo user you created. And you’ve successfully ran some sudo commands, then you need to disable root user from logging into your server.
You should also disable password authentication to immediately shut down any brute-force password login attempts.
Disable root user login on Ubuntu 20.04
Before disabling root login, please ensure you have logged in and tested your sudo user.
Let’s disable the root user SSH login .
Open up the SSH config file using the nano editor, as follows:
sudo nano /etc/ssh/sshd_config
Press CTRL + W to search for PermitRootLogin. If it is commented, uncomment it and change it’s value to no. Remove the hash (#) before it to uncomment it.The final line for it should look like this:
PermitRootLogin no
Press CTRL + X, and then Y to save and exit nano.
After making any change to the SSH config file , you need to restart ssh for the changes to reflect on the server:
sudo service ssh restart
Disable Password Authentication
After successfully testing your Ssh key pair login, you can disable password authentication on your server. This will ensure that the only way into your server is through the SSH keys you generated.
Open up the SSH config file again:
sudo nano /etc/ssh/sshd_config
Do CTRL + W and search for PasswordAuthentication and change it’s value to no. After pressing CTRL W, right click on your mouse to paste and press enter to search. If PasswordAuthentication is commented, uncomment it.
The following is what the final directive should be:
PasswordAuthentication no
Press CTRL + X, and then Y to save and exit nano.
Then restart ssh for the changes to reflect on the server:
sudo service ssh restart
That’s it for disabling the root login and password authentication on Ubuntu 20.04.
7. Add Swap File – Ubuntu 20.04
If you are on a VPS, you should definitely create a Swap file to compliment your RAM. When your system runs out of memory to use, it will use your swap file. This is convenient, especially nowadays since VPS providers use SSDs.
You can check if your Ubuntu 20 install already has a Swap location. You can still create another swap file even if it already does. To check swap availability run; Read the important note below.
sudo swapon --showImportant Note: My website is stripping out double hyphens, so type in the command as shown in the screenshot below:

Let’s create our Swap File.
Step 1 : Create an actual file to be used for swapping.
sudo fallocate -l 2G /myswapfile
I’ve named mine myswapfile. You can name it whatever you like. I’ve allocated 2 Gigs to it. At least twice the size of your current RAM is ok.
Step 2 : Change the permission of the file to root user level.
sudo chmod 600 /myswapfile
Step 3 : Actually making that file (myswapfile), a swap file and then activating it. In linux use && to join two commands. First part makes it a swap , second part activates it.
sudo mkswap /myswapfile && sudo swapon /myswapfile
Step 4 : Add it to the /etc/fstab so that the system can register it as memory file every time the system restarts. Just copy and paste it into last line in /etc/fstab . Rename the file appropriately.
Open up /etc/fstab using nano
sudo nano /etc/fstab
Add the file in the last line as follows
/myswapfile swap swap defaults 0 0
Step 5 : Is my swap active?
Check available swap files :
To check swap availability run;
Read the important note below.
sudo swapon --showImportant Note: My website is stripping out double hyphens, so type in the command as shown in the screenshot below:
Check the free memory on your system. The swap file should be included in the list too.
sudo free -h
That is how to create a Swap file in Ubuntu 20.04.
Bonus. Install Virtualmin – LEMP stack .
Virtualmin is one of the most reliable free Control Panels. Install it and use it to run as many websites as you may need to.
Get the install script:
wget http://software.virtualmin.com/gpl/scripts/install.sh
Install Virtalmin LEMP stack on your Ubuntu 20.04 Server;
Read the important note below:
sudo sh ./install.sh ---bundle LEMPImportant Note: My website is stripping out double hyphens, so type in the command as shown in the screenshot below:

This will install Virtualmin LEMP stack. Next step, go and log in via the url provided or via https://your-ip:10000. Then do the initial Virtualmin setup post installation. Your password and user are the username and password of your vps. You can use the root user or the sudo user you created to log in.
That’s it for this Ubuntu 20 Initial server setup guide. Watch the Debian 10 Initial Server setup video.
Can’t install CyberPanel
1. Install CyberPanel.
2. Exit.
Please enter the number[1-2]: 1
Please enter the right number [1-2]
At which stage is this? Choosing OLS or?
Before installing, after setup restart the server.